Thursday, June 9, 2016

DIY Dishwasher Soap Tablets!!


This has been on my list of things to try for a long time. And since I am now doing "Try It Tuesday" on my snapchat(soapychef), it was a good excuse to do it!

Dishwasher soap is expensive, and I remember years ago, when they first started making the tablets, that you weren't even supposed to touch them with your bare hands! I am not sure if that is still the case, but I do still hold it by the wrapper and put it in as carefully as I can so I don't touch it. And this is cleaning your dishes!! And you eat off your dishes!

I will admit that I am not one of those people that is always reading ingredients and stressing over organic this, organic that. I do it for my food clients and I do it for my soap clients, but it is not entirely who I am personally. But that doesn't mean that I want to eat off of dishes that have unknown ingredients essentially baked onto them in the dishwasher.

But mainly I wanted to do this because of the cost and the convenience. We have 3 small children and run the dishwasher at least every other day, if not every day. We need a lot of dishwasher soap. And even when the grocery store has sales on the soap, it still isn't as cheap as doing it yourself!

So I did a bunch of research on Pinterest and YouTube and kept finding the same recipe over and over. I did like this video the best though. Here is the recipe I used:

1/2 Cup Borax
1/2 Cup Washing Soda
1/2 Cup Epsom salts
1 Tbsp Baking Soda
1 Tbsp Citric Acid
2 Tsp Essential Oil (I used orange)
2 Tbsp white vinegar

You can find borax and washing soda in your laundry aisle at the grocery store. Epsom salts can be found at any pharmacy or any place that sells beauty products. Citric acid can be found at Target or Walmart near the canning supplies. Essential oils can be found at health food stores and also at craft stores.

This is what they look like.


To make this recipe, just mix all of the dry ingredients in a bowl. I wear rubber gloves because the ingredients can be abrasive and make my nails scuff up. Make sure there are no lumps. P.S. I doubled the recipe. 


Then add the essential oil to the mix and continue to mix with your hands until it is well incorporated.
Then add the vinegar very very slowly! If you have made a volcano in science class, you know that baking soda and vinegar react!! Just add a few drops at a time and mix mix mix.

Your mixture should look like wet sand. You should be able to grab a handful and squeeze it and it will stay together and not break apart.

I molded mine into ice cube trays, but you can use any mold you have, especially if you have one of those silicone brownie molds.

I left mine in the mold for about an hour and then released them onto a sheet tray lined with a soft towel. They came out perfectly.


I tested one immediately (with a family of five, there are always dishes to wash) and I was very impressed. My dishes looked just as good as they do with my Finish detergent and my dishwasher itself looked really shiny and clean.

All in all, a success!

Hope this works for you too! Please comment if you have any questions or want to show me how you did it!

And if you would like to see what I do for my next "Try it Tuesday", follow me on snapchat!


Sunday, June 5, 2016

Week 1 - Success? Maybe.

I tried. Not sure I succeeded, but I tried!


Sunday was "Soapy Sunday".
I made these adorable lip balms. They were made inside these little coin purses. One is flavored with margarita, and the other with pina colada. Yum.
These little purses are crazy adorable and I can't wait to see how they sell at my show in 2 weeks.


Monday was "Makeup Monday".
Since I am not a seasoned makeup artist and I am not used to doing tutorials, I just shared my favorite mascaras and lip products.
Here they are!
I applied the Rimmel Scandaleyes on my lashes to show how good a drug store mascara can be!!
Pretty good for one coat!! 

Tuesday was "Try it Tuesday". I made a wool dryer ball. I pretty much hated every minute of it. My hands kept cramping up when trying to roll it tightly and the ball kept falling out of my hand and unraveling. But I didn't give up and finally ended up with a good product!
In case you are wondering, you use these in the dryer instead of dryer sheets to help with cling and also to decrease your drying time. I am happy with the result, but I don't see myself adding this to my product line. I was literally sweating!!!!

Wednesday was "Wet Nails Wednesday". I talked about my history of nail biting and how I finally quit. I talked about it a lot in my last post here as well. After talking about how I did it, I then did a manicure with Essie's "High Class Affair" color. I thought they came out pretty nice!

Thursday was "Thirsty Thursday". I attempted to make one of my favorite drinks - the Thai iced tea.
I went to the Asian grocery store and bought Thai tea and brewed it with some cardamom and star anise. I added my sugar straight to the hot tea mixture. Then, when it cooled, I poured it over ice and then added some fat free half and half. It was just "okay". The flavors were right, but it just didn't taste rich enough. I know that in restaurants, they use sweetened condensed milk or real cream instead of the fat free stuff, but I was trying to lighten things up. Next time I will try it with the sweetened condensed milk for sure.

And finally, Friday was "Foodie Friday". This was probably my favorite day this week. I am a chef, but most of the food I make for my food business is more day to day food and the same goes for the meals I make for my family. It was fun to make something a little more fancy for a change.
I made a mushroom and kale risotto. So so yummy! The mushrooms came from the same Asian market where I got the Thai tea. And the kale came from my own garden! I am looking forward to stepping up my game for next week!

All in all, I had fun and it was cool to hear the feedback from my snapchat followers as I went along.

If you joined me on snapchat all week, thank you so much! If not, add me and join me this week!!


Please follow me anywhere and everywhere!
www.thesoapychef.etsy.com
www.facebook.com/thesoapychef
www.instagram.com/the_soapy_chef
snapchat: https://www.snapchat.com/add/soapychef
Twitter: www.twitter.com/thesoapychef
YouTube: https://goo.gl/bEur1Q

Wednesday, May 25, 2016

Beauty Blogger? Or maybe Lifestyle? Who knows? Who cares?

I have a lot of interests.

I have 2 businesses - One is my local catering and private chef business. I get to make all types of food for all types of people!

The other one is my soap business - this one seems to be taking over my entire life, and I am loving it. I am starting to move into wholesale and hopefully soon you may see my products in your favorite boutiques!

This is my "Stormy Night" soap, freshly cut.

But then there are a few other aspects to me that have been worming their way into my daily life more and more lately! One is nails.

I have been a nail biter since before I can remember - my mother says that I copied my older sister and started biting around age 3. And I was not simply a nail biter. I also picked at the cuticles and the skin around my nails. They were gross.

But in January of this year, I decided that it was time to stop. I have tried pretty much every tactic known to man over the years and nothing stuck, but this time, I was determined to make it work. So, I went on Pinterest and typed in: "how to stop biting your nails". This article came up.

It was amazing. I followed what she said and it worked. I also started watching YouTube videos like crazy about how to grow your nails and how to care for your nails, etc. My nails grew well and quickly.

This was after only 2 weeks!!


One side effect from watching nail videos is that you then start watching nail art videos!
It started innocently enough, but then I was watching them a lot and buying lots of polish and constantly working on them. It paid off - I have beautiful nails that I haven't bitten or thought about biting in over 3 months now. I can't believe it.

This was after 2 months!!

Another side effect is that the nail videos led to other beauty videos and I started to look at the makeup they were wearing. I then started watching makeup tutorials. And then I started buying a lot of makeup and trying new things. I have not missed a day wearing makeup now since the beginning of April. It's good - I am becoming a bit more put together, I guess!!

My regular daily makeup look.


I have wanted to make videos of my own for YouTube for a while now. I would love to show how I make my soaps and other beauty products, but also show the food I make.

I have now expanded to wanting to share nails and makeup as well. But I am not sure I am ready to be on YouTube just yet! So here's the plan:
I am going to start using Snapchat as my platform and see how I do. This will be my weekly schedule.


I hope you will tune in!

I thought I might add another day to the list - Saturday or Sunday will also be share day. That day I will write about my entire week here.

Please let me know what you think and if you have any suggestions for things I can do on any of the days.

Please follow me anywhere and everywhere!
www.thesoapychef.etsy.com
www.facebook.com/thesoapychef
www.instagram.com/the_soapy_chef
snapchat: https://www.snapchat.com/add/soapychef
Twitter: www.twitter.com/thesoapychef
YouTube: https://goo.gl/bEur1Q


Wednesday, November 11, 2015

Toasted Brown Rice Milk at Home

Making your own rice milk

Rice milk is so versatile. I am a chef and a soapmaker, and I use it in the food I cook, drink it with a bit of vanilla and honey, and I also use it in my soaps. It is so easy to make as well!


In July, I had the pleasure of teaching the participants at the Florida Soapcrafters Conference about using and preparing food for use in soap. My presentation was well received because we all want to use food products in our soaps, and many of us do already, but some just don't know how to make things ourselves. Doing it yourself is a great way to cut costs and also make sure you know exactly what ingredients you are using.

So, to make a beautiful rice milk in the comfort of your own kitchen, you need just a few items.

1 cup of rice (I use organic brown rice)
3-4 cups of cold water - you can use whatever water you would be comfortable drinking
A container with a tight fitting lid that can hold at least 4 cups of liquid
A blender
Fine mesh strainer or nut milk bag
A small skillet or frying pan to toast the rice

1. Pour 1 cup of rice into dry pan on medium heat. Stir rice around in pan(do not leave it alone because it can burn quickly).
When you start to smell a nice nutty toasty rice smell, take the pan off the heat(about 3-4 minutes max)


2. Put rice into your container and cover with 3-4 cups of water. Cover, give it a little shake, let sit for 12 hours or overnight.


 3. Pour entire contents of container into your blender and blend until you don't see any pieces of rice going around.


 When it is done blending, it should look frothy, like this.


 4. Pour the contents of the blender through a fine mesh strainer or a nut milk bag. I got this strainer at my restaurant supply store for around $30. You can find nut milk bags online and sometimes at higher end kitchen stores.


5. Put contents back into jar and refrigerate overnight. Anything left in the strainer after the liquids are gone I put onto a piece of parchment paper and I dry in the oven at 170 degrees Fahrenheit  for about 2 hours.

 Here are the solids about to go into the oven.


Now we just wait.

 You can see in the image below that even though it has been strained, there is clearly a separation of solids and liquids. You can either just shake it up every time you use it(this is what I do) or you can strain it a second time.


Above is what it looked like after I shook it up. Looks great and consistent again.

6. If you chose to dry out your solid rice flour, remove it from the oven, allow it to cool, then put into your blender until it looks like flour. Here is mine.


7. Time to use your rice milk. If you want to drink it, I like to shake it up, add a teaspoon or less of vanilla extract and a tablespoon of honey.
If it is going into your soaps, just shake it up and measure it and add it to your soap.
For smoothies or any other food products, simply treat it like milk and enjoy it!!


Monday, November 9, 2015

It's November - Great Cakes Soapworks Challenge!

The Great Cakes Soapworks Challenge - NOVEMBER!!!


This month's theme is the "Tall and Skinny Shimmy", as presented by the amazing soaper, Tatiana Serko. I have followed her blog and drooled over pictures of her soaps on Pinterest, so I was super excited to learn ANY of her techniques.

The technique is pretty straightforward. You have 7 colors and you tip your mold each time while pouring the color along the wall of the mold on the lower side.

Here are all of my materials lined up.


I built my mold as directed in the tutorial, mixed my 7 colors, and measured my oils.


One thing that I was really excited about was that Tatiana suggested not using the stick blender for this soap. I have never made soap entirely with a spatula, but I really loved it. I just felt like I was in charge, not the soap! It didn't take long to reach emulsion, and I really got a good feel for what the soap was doing.


 Here are all of my colors, ready to be poured. This was where I started to get a little nervous, but I took the plunge and got started.


This is what it looked like on the top when I was done. The black and orange stripes were super cool to me because the black and orange were the 2 bottom colors. I could not wait to see what this thing was going to look like. I figured that even if it didn't do the "shimmy", that it would still be super cool.


 Cleanup was a breeze because I used all paper cups.


The mold has been opened. What will it look like on the inside?


This is the part where I did a happy dance in the middle of my kitchen! Seriously! Look at those shimmies!!


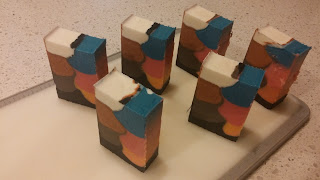
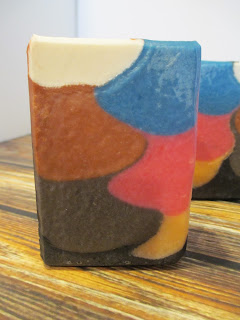
 I wanted to do a gray and brown combo on one side and color on the other, kind of like Dorothy going from Kansas to the Land of Oz. So, I have aptly named this soap, "Welcome to Oz".

I am thrilled with the result and excited to share it with my customers as soon as it is cured.

And here they are - all cleaned and shined up! I am really happy!


Please visit and like my Facebook page
www.Facebook.com/thesoapychef
And this soap will be available in about 4 weeks on my etsy page.
www.thesoapychef.etsy.com